Techniques in the Field
There are many different ways of collecting fossils and each is adapted to a particular situation. Tools and techniques that work in sandy matrix in the Gobi Desert of Mongolia will differ from those necessary to extract specimens from the extremely hard and brittle volcanic rock of the Chilean Andes. For specific examples, take a look at the narratives and associated PowerPoint presentations in Follow the Specimen.
It is vital to remember that the safe collection of the specimen is paramount, and that specimens collected in the field must later be prepared in the laboratory. Collecting decisions should be made with the goal of obtaining a stable specimen with the greatest amount of information preserved in mind. No fossil should be collected without good data; these typically include GPS coordinates, digital photographs of both the specimen and the site, and field notes about stratigraphic placement, and taphonomic information.
The basic collecting methods employed by vertebrate paleontologists generally can be grouped according to the size of the specimen being collected. Bear in mind that what follows are the most simple of descriptions; each case has many variables that may cause damage to the fossil, sometimes irreparably. Proper instruction as well as experience can be vital in preventing or coping with challenges in the field.
Small
The tiniest specimens, such as early mammal teeth and jaws, can be smaller than a grain of sand and difficult to see without the aid of a microscope.
Dry Sieving
Dry sieving utilizes screens of progressively smaller mesh size to sieve out the smallest specimen. This method is useful for the smallest fossils (such as tiny teeth in very loose, sandy sediment); it also can be used to find fragments of bone that have weathered out on to the surface surrounding a larger fossil. The material is placed into, and gently run through sieves of progressively smaller mesh size to isolate the fossils. After initial sieving in the field to remove most of the matrix the samples can be shipped back to the laboratory, where the fossils can be picked out with the aid of a microscope.
Screen-Washing
Underwater screen washing of fossil-bearing sediments or fissure fill deposits can aid in finding the smallest specimens. In some cases, the sediment is too hard and tightly-packed for dry sieving. If it will break down into unconsolidated matrix in water and if the specimen will not be destroyed when submerged, then the material is placed into a screen washing box or sieve, soaked and then gently agitated underwater. Screen mesh size can be varied as necessary, depending on the size of the fossils likely to be collected. Once no more matrix will pass through the screens the residue is removed and air-dried. The dry concentrate can then be bagged and shipped back to the lab for processing under a microscope.
Medium
Medium sized specimens include bones or fragments ranging in size from 1-2 inches to the size of a human femur.
Surface Collecting
Specimens that can be collected without digging a hole larger that one meter square. Isolated specimens or fragments of bone that are called “float” are often found on the surface of outcrops. All float fragments associated with a find should be collected. This is done by tracing fragments back up the slope to determine the highest level of the bone. Even small pieces are worth collecting, as they can be informative fragments of a larger bone.
Often these specimens can be simply wrapped in toilet paper, labeled and bagged, although larger sized specimens may need to be supported with a field jacket. Jackets for medium sized specimens can often be made using plaster bandages, obtained from a medical or art supplier. Again, remember that damage to the specimen should be avoided. Proper permitting procedures normally apply to this type of collecting (see the Acquiring section in the Collection Management module for more information).
Large to Very Large
Specimens that are too large to be lifted by one person to complete articulated skeletons of the largest dinosaurs.
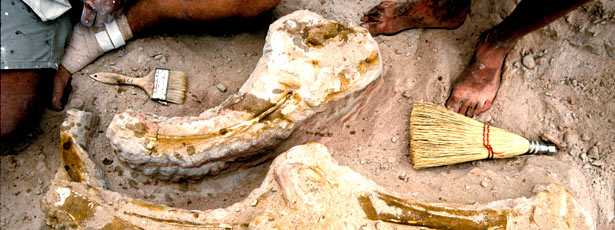
Excavating
Excavating larger bones or an articulated specimen is complicated and paleontologists are often constrained by time, money and manpower. In addition, it is often difficult and (and may even be dangerous) to attempt to “field prepare” or extract bones from the matrix in field conditions. Instead the excavators extract the specimen and some of the surrounding matrix as a block. This block is then transported back to the lab where it can be prepared under controlled conditions. The process of digging out and lifting these blocks is one that hasn’t changed much in the past 100 years but, if done badly, it can cause serious damage to the specimen. While specific materials may differ the process generally involves the following steps (for additional information download the additional resources listed below):
Removing the overburden
The excavator must try to determine the position of the fossil to ensure that they collect the entire specimen. The overburden is then removed using hand tools such as hammers, chisels, small picks, awls and brushes until the edges of the specimen are clear, revealing the extent of the bone.
Consolidation
If the freshly exposed bone is fragile it can be consolidated. Field consolidants are chosen based on the desired properties of the consolidant (strength, glass transition temperature, re-solubility), solvent availability and matrix properties. Thin gauze, layers of Japanese rice paper, or toilet tissue can be adhered to the bone with consolidant to give additional strength. If the matrix is extremely crumbly it too can be consolidated. The purpose of the consolidant is to strengthen the bone enough so that it can be collected safely, the consolidant should be removable in the lab. For more on consolidants and adhesives, click here.
Trenching
After the edges of the specimen have been delineated, and fragile areas consolidated, work can begin on trenching around the entire specimen. Beginning several inches away from the bone, earth is removed all of the way around the fossil, and down to well below where the bottom of the specimen is thought to be. This procedure leaves the fossil on a matrix pedestal making the specimen look like a “mushroom.”
Jacketing
A History of Jacketing
The challenges of jacketing in the field are also described by C.H. Sternberg who, working with his sons, became one of the most successful fossil hunters of the late 19th and early 20th century.
“[the skeleton] lay up a narrow gorge, too narrow to get a horse up. We were obliged to cut steps up and down the rough way from the nearest point we could reach it from camp, and Levi had to carry nearly all the water, plaster, burlap and paper, etc. necessary to wrap a skeleton nearly thirty feet long. The distance from the wagon was nearly an eighth of a mile. [Levi]…would have to strap his burlap strips beneath the specimen in such a way that the rock did not fall out. It would often take him many minutes before he could get a strip to stick. He lay on his back and patted the plaster-soaked burlap with the ends of his fingers until the blood came. Often the plaster would harden before he could get it to stick. Then he had to take a new strip and again go through the same hard and patience-trying labor, filling his eyes with burning lime.”(C.H. Sternberg, as quoted by Spalding, 1993: p.154)
When the specimen sits on its pedestal it is ready to begin the process of jacketing, constructing a plaster bandage, or plaster and burlap casing. The plaster jackets must be built strong enough to protect the specimen during transport but should also come apart in layers and separate easily from the specimen when back in the lab. A separating layer of toilet paper, paper towel, or even aluminum foil is used to fill in undercuts that would make the jacket difficult to remove and to keep the plaster from sticking to the fossil. When jacketing the top and sides has been completed the pedestals must be undercut and the block turned over so that padding and jacketing can be completed on the underside. This is the most stressful part of the process; if care is not taken the entire fossil can fall out of the jacket.
It is usually a good idea to work with a preparator in the field or, if that is not possible, discussing the process of jacketing with a preparator beforehand. If the jacket isn’t well constructed, the specimen can be damaged during extraction, transport, or when opened in the lab. Given the effort and resources that go into collecting, this can be a terrible loss. Researchers who understand the process of un-jacketing the specimen in the lab are better able to construct safe jackets in the field.
Jackets containing entire dinosaur skeletons may weigh well over a ton, if you intend to collect such a specimen it must be done carefully to ensure the safety of all of the crew and the specimen. For very large jackets, logistics become very important. Problems to consider include:
- How do we move a large, heavy and inert object in the safest manner possible?
- How many people are needed to move this block?
- Is the block supported well enough to move safely?
- Do we need additional vehicles to carry this specimen?
Labeling
Every specimen and jacket should be accompanied by its field number. This information as well as collection and locality notes, information on the construction of the jacket and how to approach its removal in the lab, the orientation of the specimen, etc. can be written directly on the dry plaster jacket. Photographs and field notes are also invaluable resources for preparation in the lab.
Specimens, once collected are transported back to the lab where the painstaking work of extrication from the matrix begins. Read more on preparation techniques here.
Resources
Download Charles R. Schaff’s nine-page pdf document Procedures in Collecting Fossil Vertebrates which covers, among other topics:
- Methods of collecting and excavation
- Excavating fossils
- Jacketing fossils
- Underwater screen washing
- Recording specimen and locality data
Additional field preparation tips by Marilyn Fox, Preparator at the Peabody Museum of Natural History, Yale University can be downloaded here.
For an overview on collecting visit Preserving Vertebrate Fossils: Notes from the Laboratory by Gregory Brown, Chief Preparator, Division of Vertebrate Paleontology, University of Nebraska State Museum.
For details on jacketing, download the presentation Jacketing the Desert Sands by
Marilyn Fox, Faysal Bibi, and Andrew Hill, Yale University, available on the Society for Vertebrate Paleontology Preparators Session Page.
Technical Paper #2: The RONDAN Jacket Support Clamp and Jacket Transport Sled by Ronald E. Peterson, N.V. “Dan” D’Andrea, and Andrew B. Heckert or the earlier print version of this paper under the same title, in New Mexico Museum of Natural History and Science Bulletin 16, pp. 277-284 (S.G. Lucas, editor).
Packing And Transporting Vertebrate Fossils Overseas by ReBecca Hunt.
Colbert, Edwin H. 1980. A Fossil-Hunter’s Notebook: My Life with Dinosaurs and Other Friends. New York: Dutton. For specific information on collecting see pages 63-64.
Spalding, David A.E., 1993. Dinosaur Hunters. Rocklin: Prima Publishing.
While some of the specific materials are out of date, the 1960 book Digging for Dinosaurs: Adventures in Nature and Science by Edwin H. Colbert and William A. Burns gives a good walkthrough of the excavation process for children.
Further material can be found on the Paleontology Portal Collection Management Module, including information on excavation and specimen data.
