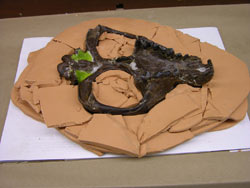
Jacketing, Demolding, & Cleaning
 Jacketing
Once the mold has set, a jacket or “mother mold” may need to be constructed to help support the soft rubber of the mold. These jackets are usually made of plaster, although large jackets are sometimes made of fiberglass. The process of jacketing one-part molds with straight walls is relatively simple, but more complex, multi-part molds require multi-part jackets. Jackets help in the alignment of multi-part molds, ensuring a tight fit of all of the parts and a thin seam line.
Block making
Molds made for complex shapes may have deep undercuts or crevasses, even after the rubber has been applied. These complicated molds may require making blocks to fill in undercuts that might cause the jacket to be difficult to remove. A block, usually made of plaster, is used to fill in undercuts with small removable pieces which make the surface less irregular.
Demolding
Demolding the specimen can be scary for the preparator and dangerous for the specimen as this process carries the greatest potential for breakage and damage. Great care must be taken at this stage. Some molds have to be removed only in certain directions to avoid putting stress on raised parts of the specimen. If this is the case, it should be noted in some way on the mold or on the jacket; it is very difficult to remember the exact shape of a bone under a layer of rubber. In general, the idea is to loosen the rubber from the specimen, and allow it to pop off. Small specimens can be loosened and the rubber pulled down slightly to allow the specimen to push itself out of the mold.
For two- (or more) part molds, demold one part at a time, allowing the other parts to remain supported by the jacket until you are ready to demold them. Sometimes multi-part molds will need to be demolded in a certain order. Again, this can be noted on the jacket.
If the specimen breaks, don't panic. Some breaks can be glued together with Paraloid B72 or Butvar B76 in the mold. The adhesive will not stick to the mold. Otherwise, carefully remove all pieces and place them in a clean box. Remove the entire specimen from the mold. Carefully look over the specimen for any other breaks or loose pieces. Reassemble any breaks without adhesive first, as it is sometimes necessary to put one piece back first before others can be joined. Also some pieces may fit in a way that blocks others. By fitting the pieces together dry you can decide how to proceed. Both Paraloid B-72 and Butvar B76 are reversible in case pieces need to be moved. For more information see the section of this site on Adhesives and Consolidants.
Post Molding Cleaning
After the specimen has been safely removed from the jacket, it is important to clean it right away before returning it to the collection.
- Paraloid or Butvar can be removed with alcohol or acetone
- Carbowax can be removed manually with a needle, and a brush with water will remove the remainder. For specimens in water soluble matrix, alcohol can be used.
- Cyclododecane can be more quickly sublimated using heat and forced air
- Clay and wax must be gently removed with a needle, and cleaned with a brush and either alcohol or acetone.
Make sure the number and any other pertinent information is in place on the specimen and has not been removed or rendered illegible during molding or cleaning. The specimen should be in as good or better shape after molding as before.
For more detail on procedures for jacket making, demolding, and cleaning, download the Basics of Moldmaking by Marilyn Fox, Preparator at the Peabody Museum of Natural History, Yale University.

