Tools & Equipment
 A fossil preparation laboratory contains specialized tools, equipment and materials that enable the preparator to complete the exacting tasks required to both expose the fossil and to preserve it for future generations. Below are technical recommendations based on the advice of a number of preparators.
Although there is obviously some overlap, the information is divided up as follows:
When possible and/or appropriate, vendors and sources are given. This is done solely to provide examples and does not imply endorsement. In order to safely use this equipment and tools it is important that the lab have the correct infrastructure. Access information on the Fossil Preparation Lab here.
Micropreparation equipment
Stereo dissecting microscope
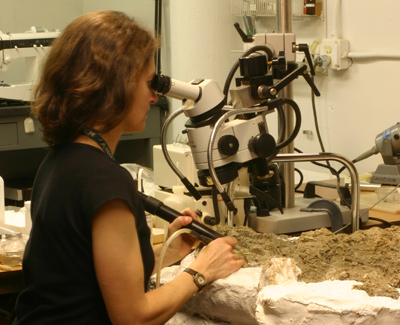
A good quality dissecting microscope is an essential tool with magnification of 1x and .5x objective lenses, and a focal range from 6-8 to 40 times. In general, specimens should be prepared using the best quality microscope affordable.
Boom arm
In order to be able to work on fossils of different dimensions, the microscope should be mounted on a boom stand, which consists of a heavy base, an upright and a boom arm which holds the microscope head. This allows the microscope to be moved over a specimen block. The longer the boom arm the better, in order to keep the work surface clear. One drawback to be aware of, however, with a long boom arm is that at any room vibration will be magnified while using the microscope at high magnification. Long boom arms are also expensive, but it may be possible to fabricate your own. It is critical to make sure the scope can’t fall over when the boom arm is extended, either with counterweight sandbags or by clamping it to the bench surface.
Fiber optic illuminators (branch and ring)
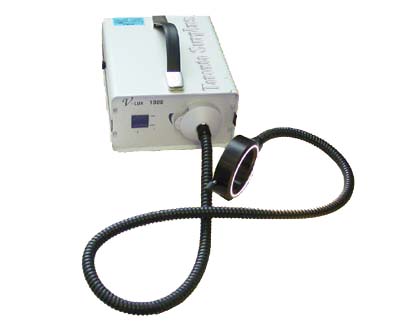 A combination of branch and ring lighting are recommended when working under the microscope.
- Branch light is directional and is better for seeing the highlights and shadows of surface topography and glossy coatings.
- Ring lights cast no shadow and are better for seeing through coatings and into deep holes.

 Adjusting the balance of these two types of light allows maximum visibility. Sometimes a feature which cannot be seen in one light becomes clearer in another (some sutures, for example). Some microscopes come with attachments for one or the other- it is well worth getting a custom attachment made so both light sources can travel up and down with the scope. This facilitates micropreparation and helps keeps the work surface clear (e.g., here).
Work boxes/trays
Trays or work boxes are used around a specimen to ensure that any fragments that inadvertently fall or fly off during preparation are trapped and, thus, retrievable.
Micro-prep tools
Needles
Most microscopic preparation is done with fine needles held in the hand. These needles are shaped as needed by the preparator. Shapes can range from extremely fine points, to small chisels, depending on the type of matrix and on the area of the fossil to be prepared. Two different types of needles primarily used are:
- High Speed Steel (HSS) drill blanks - Drill blanks are softer but more flexible and are best for extremely sharp points. They come in a wide variety of sizes but the ones most often used are High Speed Steel (HSS) #'s 52 (diameter decimal equivalent .0635) and #41.(diameter decimal equivalent .0960). They can be special ordered in 6" lengths. Any shorter and they must be held in a pin vise.
- Carbide rods - Carbide is harder but more brittle and is often ground to a half-round chisel shape with edges for cutting and scraping. Carbide needles must be held in a pin vise.
Insect pins, sewing needles or hypodermic needles are generally too flexible for most preparation uses but are occasionally used by preparators for specific projects. For more on this topic see the chapter by William w. Amaral on “Microscopic preparation” in Vertebrate Paleontological Techniques by Patyrick Leiggi and Peter May, 1994.
Initial needle sharpening is done with a bench grinder, fine sharpening and touch-ups are done under the microscope with a diamond wheel using a rotary flexible shaft tool or on a diamond wheel. Drill blanks can also be sharpened with an oilstone.
Pin vises
Pin vises securely clamp the needle (although longer drill blanks can also be used without a pin vise).
Air pedal
This is simple tube of air that is stuck into the back of a Starrett pin vise and needle. The air blows out the cracks where the needle is held in the jaws of the pin vise and blows away the dust of preparation. The stream of air is controlled with a foot pedal and tubes of the type used by dentists. For more on air pedals for preparation download the 1998 SVP poster presentation A Foot-Controlled, Chip Blowing Needle For Micropreparation of Fossil Vertebrates by AMNH preparator Amy Davidson.
Macropreparation equipment
Air compressor
Many tools for the preparation of large material are air-powered (pneumatic). These require an air compressor to operate. The necessary compressor size is dependent on the air specifications of the tools and how many will be running at once. A basic compressor that will allow the use of two pneumatic tools at one time produces at least 10 CFM at 90-100 PSI with an ON pressure switch not below 110 PSI (for example, pressure range between 110 and 145 PSI). The larger the tank the less often the compressor will need to run, if the tank is too small the machine will run continuously and will wear out faster. These machines are quite noisy. It is possible to locate the compressor in an uninhabited room and connect it to the work area with air hoses (e.g., here). For more information on choosing a compressor click here.
A number of other accessories and pieces of equipment are often necessary to attach the required tools to your compressor and airline. A typical setup will include the following (in order):
Air hose
Depending on the setup air hoses may be necessary to connect tools from the compressor to the work area. Couplings and/or reducers may be necessary for secure attachments. N.B. brass pipe is more expensive than black pipe but it will not rust and send corrosion particles into expensive air tools (e.g., here)
Airline pressure regulator
All air systems require a basic pressure regulator and gauge in order to keep the pressure at the recommended level (90-110 PSIG for most tools n.b. the air pedal may require lower pressure than this). e.g. here
Air dryers
Desiccant dryers keep condensation from reaching the tools. Some use silica gel crystals to absorb water, turning from blue to pink when saturated (e.g. here).
Inline filters
These small filters protect the expensive pneumatic tools connected to the airline from water condensation, dirt and rust particles that form in the compressor tank and air pipes. In-line filters screw into the air hose at one end and the quick-release coupler at the other. When installing the filters ensure that it is being placed with the air flow direction arrow in the right way. Filters should be cleaned and/or replaced as necessary (e.g. here).
Quick release couplers
Couplers enable the preparator to quickly change from one tool to another, both male and female couplers plugs and coupler bodies are needed (e.g., here or here).
Lubricators
Lubrication using high quality tool oil is necessary to keep tools’ internal moving parts moving properly. This can be done by hand or using an in-line lubricator that automatically adds drops of oil to the air before it passes into the tool. Most preparators seem to feel that in-line lubrication is more trouble than it is worth (e.g., here).
Airscribes
Airscribes are pneumatic “pecking” tools, like miniature jack-hammers. With the tool held on the matrix and not on the bone the percussion of the tool forces small flakes of matrix away from the bone. Airscribes vary in size according to how much material can be removed with each stroke, allowing for the bulk removal of large amounts of hard matrix to those which allow for grain by grain removal. With experience, the preparator can clean the most delicate of fossils using these tools. Having a range of airscribes is recommended.
The tools consist of a handpiece, a stylus or needle (usually made of carbide), and a bushing that screws onto the handpiece and holds the stylus (or needle) in place. Several different manufacturers make airscribes of various sizes and styles and some are known to produce cheaper copies of other manufacturer’s designs. Two useful models include:
- Chicago Pneumatic Tool Co. Airscribe CP-9361 Model A is often copied (Paleotools which specializes in tools for fossil preparation markets a similar product, the MP9100). The Chicago Pneumatic aisrcribe can be modified with Paleotool’s longer carbide stylus and bushing. The Airscribe can remove large amounts of material fairly quickly but care must be used to avoid damage to the specimen as the tool is quite powerful. This tool is also quite noisy, so ear protection is vital.
- Paleotools produces a wide variety of pneumatic scribing tools. The Swedish made Aro Marxal Marking Pen (ARO 8315-B) is another example. Its tips can be modified with Paleotool’s longer carbide stylus for finer preparation, with a short (non-carbide) German Bushing and Micro-Stylus (available from Stone Co.). The ARO is now difficult to find as the company was bought by Ingersoll Rand.
Airscribe tips can be sharpened on a bench grinder, or with a diamond wheel using a rotary flexible shaft tool. The tips can be cleaned by swishing in ethanol (after removal O-rings) and wiping. O-rings should be replaced when worn. Do not use solvents on air scribes. It is important to keep the internal moving parts of your tools lubricated with a high quality tool oil. This is best accomplished manually by dropping oil directly into the tool and/or into the other end of the hose to be carried into the tool by the air.
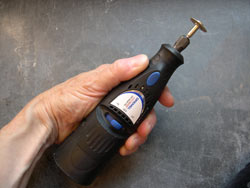
Rotary flexible shaft tools
Rotary tools are used less often than scribe tools for preparation of specimens but tiny dental burs or larger diamond burs can be used to delicately remove material too brittle or hard, for example hematitic matrices, to be prepared with a scribe. A rotary tool can also be useful in the prep lab for sharpening pin vises, trimming jackets, sectioning, sediment sample preparation and other destructive sampling techniques.
The handpiece is a hand-held fixture that transfers power from a motor to the accessory tool such as a bur, drill bit, or mandrel. Flexible Shaft type handpieces connect to a shaft in a protective sheath that is connected to the motor. Power travels down from the motor through the flexible shaft and into the handpiece. The handpiece uses the power to create a rotary action for the installed bur or other accessory. Depending on the make and model, the tools can be suspended or table-top mounted and may have the option of a foot pedal for operation if desired. The two tool brands most commonly used are:
- Dremel – These tools are more common for the craft market e.g. 4.8 MiniMite Cordless kit Item #750.02 This compact tool is good for dressing needle tips under the microscope when fitted with a diamond wheel
- Foredom – These tools tend to have a more powerful motor and may be more practical over the long term. e.g. the Foredom 2220 SR motor Jewelers Kit with the Foredom No. 28 Handpiece, Series S 1/8th HP Hanging Motor, Series 1/8th HP bench motor w/ speed control, and Series S S-FCT # 30 handpiece
Both are widely available and come with a wide variety of grinding bits.
Electric bench grinder and wheel
A bench grinder is basic equipment for sharpening needles. Bench grinders vary in quality. It is worthwhile investing in a well made, heavy-duty grinder with cast parts (not sheet metal). 2 regular aluminum oxide wheels (one coarse, one fine) are adequate for softer steel, such as the HSS drill blanks recommended above. Harder carbide rods require silicone carbide (green) wheels for sharpening (e.g., here).
Diamond wheels
These can be used with a Foredom or Dremel grinder to sharpen needles under the microscope. It is important to purchase a very fine grit. Too coarse a grit will grab and snap the fine point of a needle (especially brittle carbide). Diamond wheels can be found at most jeweler’s supply stores.
Micro-air abrasive
Often even when prepared well, specimens will retain a fine film of dust. This can be most easily removed by micro abrasion. Essentially a micro sand blaster, this machine pelts the fossil with a fine stream of abrasive such as sodium bicarbonate. Care should be taken, though, as with any tool, damage can be done by over eager air abrasion (e.g., here).
Molding & casting equipment
Balance
A digital scale sensitive to .01 or a triple beam balance is extremely useful in mixing up adhesives and casting resins that must be precisely measured.
Vacuum chamber
Molding rubbers and casting materials require de-airing to prevent the formation of air bubbles and the resulting loss of information in the finished product. Both types of materials are de-aired prior to their application. Specimens should never be put into the vacuum chamber. The chamber can be homemade but must be able to withstand vacuum pressure of 29+" Hg (759mm) at room temperature. It will implode if not sufficiently strong and will not create enough vacuum if not sufficiently sealed (e.g., here or here).
Vacuum pump
The vacuum pump is necessary to create the vacuum in the chamber that removes the air from the molding and casting materials and prevents air bubbles in the finished molds and casts. It must pull at least 29+ Hg (759 mm) at room temperature (e.g., here).
Miscellaneous equipment
Wheeled carts
Carts, especially pneumatic carts, are extremely versatile and useful for moving and working on larger specimens. They should be able to hold at least 500 lbs to move around equipment and the heaviest specimens.
Lift or rolling tables
Enable the preparator to reach all sides of large fossils.
Sand bags
Sandbags of various sizes are essential for supporting the specimen and/or your hands and wrists when preparing under the microscope. They are easy to make yourself. Any tightly woven cloth will do, sewn along three edges, filled with sand and sewn closed.
Basic woodworking tools
This can include hand tools such as - jig saw, drill, hand saws, and heavy bench vise as well as larger equipment such as a table saw, drill press etc.
Rock hammers and chisels
These tools are used in the lab as well as in the field.
For information on other supplies stocked in a fossil preparation lab see the sections on Materials, Adhesives, and Molding and Casting. For vendor information for some of the items listed on this page click here.
Resources
- For a complete manual with detailed information on tools, equipment and workspaces for the mechanical preparation of microfossils download Wax On, Wax Off: A Guide to Fossil Vertebrate Micropreparation by Scott Madsen.
- Preparation of Small Vertebrate Fossils is a manual written by Peter Parks in 1972 with detailed information that is still valuable today with details on mechanical tools and techniques and other aspects of preparation.
- Get detailed information on workstations and setups from the 2007 SVP presentation Preparing to Prepare Your Fossil Vertebrate: Setups to Maximize Speed and Control by AMNH preparator Amy Davidson.
- Download the Burke Museum Lab Manual and read their section on Lab Basics and Tools of the Trade.
