Before you begin
Before you even pick up a tool to begin to prepare a specimen, there are a number of tasks that need to be done.
Establishing Communication
Preparation is normally done with a specific aim in mind e.g., identification, research, or display. The goal of preparation should be clear to both the requester (i.e., researcher, exhibits team) and the preparator. Preparation is time consuming and is best done with a specific aim in mind. The preparator should understand what data are most relevant and what the researcher is hoping to be able to investigate through examination of the specimen.
Assembling the Material
Assemble all relevant pieces including the jacketed block, any fragments (which may look like rubble but could be important connector pieces), field notes, maps, images, notes on conversations with the researcher. Make sure that your workspace is clean and allows for the retrieval of any fragments that may detach during preparation.
Opening the Jacket
When the specimen jacket is brought in from the field it should be brought to the “dirty prep” section of the lab. Before opening a jacket, make sure you are prepared. Have all tools e.g., scissors, rotary saws, chisels, and personal protection equipment to hand. Take a photograph of the jacket before it is opened and again after it is open. Make sure to keep notes about all data associated with the specimen; the field number and any notations on the jacket can be vital in reconstructing the specimen.
There are two main methods for opening a jacket:
- The plaster and burlap or AC filter media can be dampened, and then cut with a utility knife and carefully rolled back in sections. This may be the safest method for fragile specimens.
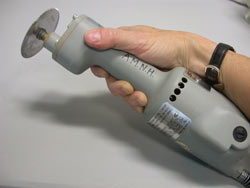
- The jacket can also be sawed, either by hand, or using a cast cutter or reciprocating saw, and lifted gently off. [image - cast cutter] With large sturdy specimens the jacket is generally sawed around the edge where top and bottom of the jacket meet. Care must be taken with this method. There must be a good separation layer between the matrix/specimen and the plaster of the jacket, and it is important to work around any undercuts to avoid tearing a part of the specimen away when lifting off the jacket. It also requires some skill to cut through only the plaster of the jacket and not into the bone. The jacket can be sawn and removed in parts to avoid damage.
Field jackets are often opened from the bottom, that is, the side that was facing downwards in the field. The specimen is usually preserved better in that direction, away from the effects of weathering. This is a decision that should be made in conjunction with the researcher and their needs for the specimen.
Click here for detailed tips and images from AMNH preparator Amy Davidson on how to safely open field jackets.
Evaluating the Specimen
Consider how preparation can enhance the researcher’s ability to safely handle the specimen (e.g., leaving matrix on one side of a structure to support it, or shaping matrix to provide ‘handles’ for manipulating the specimen). Be aware of the possibility of soft tissue, gastropods, etc. and try to avoid contamination.
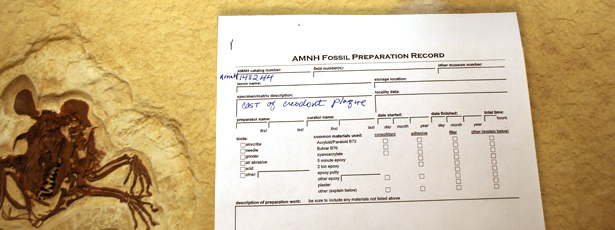
Documentation
Document all aspects of your work. Record original information from the field jacket, make notes on conversations with researchers, take digital images, record your procedures and materials. Most prep labs have standardized report forms or databases to record this information. Download examples of prep record forms here:
Now the task of preparing the specimen can really begin. Learn more about mechanical, chemical and non-invasive preparation techniques.
Resources
- Get detailed information from the 2007 SVP presentation Preparing to Prepare Your Fossil Vertebrate: Setups to Maximize Speed and Control by AMNH preparator Amy Davidson.
- Download a PowerPoint presentation Tips for Unjacketing by AMNH preparator Amy Davidson with detailed information on how to safely open field jackets.
- Two detailed manuals, Wax On, Wax Off: A Guide to Fossil Vertebrate Micropreparation by Scott Madsen and Preparation of Small Vertebrate Fossils by Peter Parks give important information on things to consider before starting work on a specimen.
- Read more in the Burke Museum of Natural History & Culture’s Lab Manual.
- Read an essay The Past Recaptured, Again by AMNH Senior Scientific Assistant Carl Mehling on specimens collected and awaiting preparation.
