Mechanical
 Mechanical preparation utilizes tools that apply external physical force to sediment (also called matrix) in order to remove it from fossil bone.
Tools used for preparation range from steel and carbide needles to mini-jackhammers and micro-sandblasters. While it is possible to use chemical and even some non-invasive techniques to reveal the specimen, mechanical methods are the most commonly used.
Once the jacket has been opened, or if the specimen is not jacketed (as is often the case with small specimens), you will probably be faced with bone that is surrounded by rock. Before the specimen can be used for research or exhibit some or all of this rock must be removed to reveal the bone.
Mechanical preparation can be divided into two categories:
Macropreparation
Macropreparation involves the bulk removal of matrix from fossils of any size from small to very large. While a microscope may be used in macropreparation, it is done on a much larger scale and so the tools, equipment and methods will vary greatly.
Micropreparation
Micropreparation is any manual preparation of vertebrate fossils on a scale that requires the use of a microscope. It is unforgiving as the specimens are often very small and even the slightest slip of the needle can result in irreparable damage.
For more information on macropreparation download the document from Peter Parks. For details on microprep techniques download the two documents from Scott Madsen.
Various tools will be used to remove the matrix, depending on the size of the specimen, the softness of the matrix and the bone, and the desired end result. The process of preparation will generally move from larger to smaller tools, using larger tools with more force to remove large amounts of matrix, and smaller, more delicate tools to remove the matrix closer to the bone in a more controlled manner.
There are some general rules that can be applied to all types of preparation:
- Think ahead – How will the specimen be used – for research or exhibit? What area will you be working on first? What section will you move onto after this? Will the specimen be left in situ in the matrix or will it be completely removed from the jacket?
- Follow the bone – Fossils can be shattered or distorted while lying in the ground for millions of years. Do not assume that you know where the bone is – it will surprise you every time, creating what Harvard preparator Bill Amaral refers to as the "tool marks of discovery". It is always best to enlarge an area of exposed bone, rather than try to "discover" the bone by blindly digging into the matrix.
- Work away from the bone – It is best to keep the tool on the matrix and not the bone. Bone is almost always softer than the surrounding matrix and the tool should be kept away from the bone to avoid damage.
- Be aware of the forces applied by the tools you are using – Scribes, chisels and other impact tools can cause damage through vibration. Pay attention to cracks in the matrix and in the bones.
- Be aware of the fossil as an object in space – Resting the specimen on delicate areas of bone can cause damage. Specimens should always be on a soft surface and may need to be provided with additional support by using sandbags or specially made support jackets.
- Let the tool do the work – Do not clench or force the tool. Sharp points and tool bits will remove more matrix with better control than dull tools or tools used with more force than is necessary.
- Work the whole specimen evenly – Do not completely prepare just one section at a time. As the specimen is prepared, it may become more fragile; having one section completely exposed while the remainder is protected by matrix may cause that section to suffer damage.
- Beware of over-preparing the fossil – If the specimen is left in the matrix take care to leave pedestals of matrix underneath exposed bones. Fossil bone does not have the internal strength of fresh bone. Prepared bones floating in air tend to break with time. They can be supported by matrix that has been strengthened with consolidant or thin fiberglass strand, to prevent movement and breakage.
Skill in preparation involves an understanding of forces, materials, and their interactions. Mastering the use of tools and adhesives minimizes the damage that can be caused by the forces necessary to remove matrix from delicate fossil bone. It’s all about control – control of the tools, of the materials, and ultimately over the specimen.
Once the jacket is opened the next steps will depend on the type and quality of the matrix and how much of it there is to be removed. Fossils are found embedded in different types of sediments, with differing levels of hardness:
- Chalks – usually very soft,
- Mudstone or siltstone – fine grained, usually soft but can also be heavily cracked,
- Sandstone – soft and unconsolidated or cemented and hard, of varying grain sizes,
- Conglomerates – having multiple grain sizes like gravel, often as hard as concrete,
- Hematitics – specimens covered in a hard layer of iron concretion.
Matrix can be heavily weathered and friable, or hard with deep fissures and cracks. These states will affect the bone within. In some cases, bone and matrix will separate cleanly and there may even be a color change that indicates when the bone is near. In other situations, such as with hematitic specimens, the matrix may be firmly attached to the bone, requiring more care and skill to remove.
It is occasionally difficult to visually see the difference between matrix and bone. If you have any doubt about what is bone and what is matrix, look under a microscope or consult with another preparator.
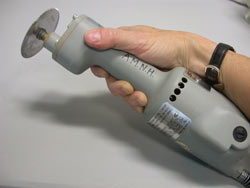
Scribing
Mudstone matrices on large bones can sometimes be removed by hand without damage, but prep often begins with air scribing. Air scribes are similar to miniature jackhammers; compressed air is used to push a piston back and forth at thousands of cycles per minute. There are a wide range of sizes and powers of scribes - from the pistol grip hammers made to remove large amounts of hard rock to very fine tools that remove one grain of sand at a time. The choice of scribe is dependent on the type and amount of matrix to be removed and the delicacy of the specimen.
The tool is held firmly, much like a pencil, sometimes using the finger as a guide for the point of the tool. Small strokes should be used, in a regular pattern. It is tempting to dig large gouges into the matrix with the tool, but there is a high risk of digging large gouges into the specimen by doing so.
The tool is kept on the matrix, working back from the edge where matrix meets bone. After removing the bulk of the matrix, allow the tool approach the bone to let the remaining matrix pop off. Note that in this image the point of the tool is held almost parallel to the surface of the bone, so that the vibration is doing the work and not the tip of the tool.
Air scribes produce dust as well as flying bits of rock, so proper protection - eye protection, dust collection, dust masks - should always be used.
Grinding
Grinding tools are used on hematitic specimens, and other matrices that are resistant to scribing, as well as for sharpening needles. They differ from scribes because there is a rotary motion to the tool. Flexible shaft tools such as Dremel, Foredom flexible shaft tools, or pneumatic pencil grinders often have variable speed controls, which allow fine-tuning of the speed of work. There are a wide variety of bits for these tools, including diamond bits, cut-off wheels, and even tiny dental bits. They are used to wear down the matrix gradually to a very thin layer, which may pop off or which can be removed with hand held points. Cut-off or diamond wheels can be used cut grids into masses of matrix that can then be removed with a chisel.
Points
Points or needles are used for microprep and for the final stages of preparing large specimens. They are made from steel drill blanks or carbide rod. Both can be held in pin vises and shaped to fit the desired use. Steel is softer and more flexible than carbide, and can be sharpened to a very fine point, for preparing tiny areas. However, the point will also wear down fairly rapidly. By contrast, carbide is much harder than steel but more brittle - the point will tend to chip.

Points must be sharpened. Usually this is done using a bench grinder, with fine and coarse grit aluminum oxide wheels for steel and silicone carbide (“green”) stone wheels for carbide. Initially the tool goes through a “rough grind,” where the rod is held almost parallel to the stone and ground to a point. The aim is to achieve a long taper, not an abrupt shoulder: the shape should be more like drawing A than drawing B.
After a rough grind using a coarse stone, the final shaping can be done with a finer grit stone or with a diamond wheel on a flexible shaft tool. Later touch-ups can also be done with a diamond stone or the diamond wheel.
Points are often shaped to form a chisel. This has the advantage of forming a sharp edge, which can be held at a very low angle to the bone to gently scrape the matrix away.
Air abrasive
Also known a micro-abrasive, an air abrasive can be used for matrix removal or for a final cleaning of specimens. It uses air pressure to create a focused stream of fine particles through a small nozzle. Sodium bicarbonate powder is the most commonly used material, as it is the most gentle on the specimen. Aluminum oxide powder is often used where cutting of the matrix is desired. However, it is also more forceful, so care must be taken to avoid damaging the fossil. The differences in the media are both the hardness of the material as well is its shape. Sodium bicarbonate has needle-like particles, while aluminum oxide particles are blocky and sharp. Generally, it is best to use the nozzle at an angle to the bone, to avoid cutting into the specimen.
For more on air abrasives for preparation download Air Abrasives 101, a 2007 SVP presentation by J.P. Cavigelli of the Tate Museum.
Gluing and consolidation
Specimens will often need consolidation and gluing during preparation. You should be aware of the properties of the various adhesives, and have them on hand before beginning to work. It is important to be aware of that glues may need to be un-glued and consolidation may need to be loosened during prep.
There is a lot more to mechanical preparation. Preparing to prepare, supporting specimens, how to position yourself to prevent injury are additional relevant topics covered in the resources listed below.
Access detailed information on both micro- and macroprep tools and equipment and outfitting a fossil preparation lab to create an appropriate work environment.
Resources
For a complete manual with detailed information on mechanical preparation of microfossils download Wax On, Wax Off: A Guide to Fossil Vertebrate Micropreparation by Scott Madsen. This document covers a wide range of topics including:
- Tools, Equipment, and Workspace
- Removing matrix
- Using adhesives Carbowax and Cyclododecane
- Mounting and storing microfossils
Preparation of Small Vertebrate Fossils is a manual written by Peter Parks in 1972 with detailed information that is still valuable today on mechanical tools and techniques and other aspects of preparation. The document covers:
- Preparation techniques
- Equipment
- Photographic specimens
- Storage of fossils
Download the Burke Museum Lab Manual for detailed information on the following topics:
- Introduction
- Personnel
- Lab Basics
- Getting Started
- Tools of the Trade
- Techniques
- Safety
- In an Emergency
Download the following presentations from the Society of Vertebrate Paleontology’s (SVP) Preparators Materials & Methods page
- Temporary Gap-Filling to Stabilize an Exploded Matrix for Fossil Preparation: the Sand and Butvar B-76 Technique – Amy Davidson
- Removing Fossil Ribs: The Thread Technique – Amy Davidson
The website of the Vertebrate Paleontology Preparation Laboratory at the Yale Peabody Museum gives information on the preparation of some important collections in their collection.
Air Abrasives 101: A primer to using air abrasive machines in fossil preparation a 2007 SVP presentation by J.P. Cavigelli of the Tate Museum.
Amaral, William W. 1994. Microscopic preparation. Vertebrate paleontological techniques Volume 1. Patrick Leiggi and Peter May eds. New York: Cambridge University Press.
May, Peter, Peter Reser and Patrick Leiggi. 1994. Macrovertebrate preparation. Vertebrate paleontological techniques Volume 1. Patrick Leiggi and Peter May eds. New York: Cambridge University Press.
Society of Vertebrate Paleontology, et al. Conservation of Fossil, Mineral, and Rock Collections. The Society of Vertebrate Paleontology Professional Development Workshop 2005 October 17-18 Mesa, Arizona. Prepared and presented by Robert Waller, Gerald Fitzgerald, Chris Collins. p. 5.
